with Kameron Christopher, Jingyin He, Wyatt Keusch
performance at Calarts
with Kameron Christopher, Jingyin He, Wyatt Keusch

I have an installation at this show… Click the picture for Peter Kirn’s writeup at Create Digital Music

I was looking at this today for dealing with overlapping midi… it prevents repeated notes from silencing ones that should still be playing.
Since I write a lot for mechanical piano, I want the repeated attacks, but only the last note-off:

----------begin_max5_patcher----------
1175.3oc4YstiiZCE92IOEHT+Y5Jaer4RkZk5yQ0pQjfaV1FfHfzNcWsu60X
CYXlgK1AhGhpFIPl3w9b9NW9NG6uuci697m4ktN+hye3rYy22tYi7S0eXSy3
MtoQOe3TTobZtGxSS4YUt6T+VE+4J42SShSbxub8GNWvKEyKpJIO6oB9gJ0l
fCC9DZmim5Ep4gyma9uxtjljchWI2Kb6REUc3KIYGe0xf6rLXlbgHcWojXoX
ku+q+LCZEp+LOqJKJkK+oeuHI5j6KarP3a2YTm4Wl7M47wjOgp+5O1ts9wNM
wK0p5Zp94QT5GSpXWe1q5QFWIZsX0y28FzfQs3IYFqZfT0TZ1TVN7GnkSpM8
pcnQzNjR6nSa2ng8qBsXm5SU+6YtZoccutJy0jlw+GgD7NK52N4TjW4f6UoI
CqzzF0E7qeQ8GyjR8M0jRFDO10ESV.K9.vRkShydScyITkmcHT+R3yyFASXK
FljTGn53tOJ63hBMo7xxni72gMHS8UHLouB.zWvEbv.3BwTbQiXm6qeh3OiS
HpRYPvROEEw1fdJHSQDXBOkNurEDYJ.AHIxzDQw7FKTBBW5PIKgLWxNGc3uL
mLU5tvnRlFZ3X9NPvZGZFJISLWr8bmexXhoV3wWUMkz+YnjMf2CUxlnym4Yw
NnaLaCET0gOZ1FxiEjbLphapGhmrXEF1SEFMJZvVonwkz87haLoJEoz7QKCm
.q95StMP.qhBzBDv9qePn+3he6WMtHsF9DV3zEuhgEKrvRTsh1bNwyl3fJnH
kqA.SePEjI8v.OUa.iRPGrd6LZHl4WnjGBFoDU49dKALR7XS20P35LM8PPXJ
u3XcsMNShkfp.F.BlGV5S6fk9AiUTDF8PUAvg7SmzLtFQm2AP1DWqZiUjmbr
LjFeJVzQCr2MU.dymKi9ad7SBIPH0OEUUUjr+Rk5zd2bEW23xELmRgUZHTVh
OzlZH9PmFhGuoF+Gz18JD6O+lqdG6KAEb3nUr.Obmz1qYl0MgVSorZwwB9Ox
jrFhHZQWBzGd9RsgEJValOf7vx7YXKfZwgQn+ekC6VuTj1T0zfouTD7GPo+x
43dJI6s2+qTWp+9qwpx7KEGZ2k1axw4E0IlWVkjIK2pyjpubxNS5KIww7rt2
gVZR74bAoaiPvD9jB2Pu.rhmCecjym60lpqzVe5MKtzNSYp9F.mTlp8MrnLI
JZvAOgH8FK+8VjzAknLyDIrHfrNcWPPmatr+Qzvqybt1alNfqk8A0ItnN6uI
xTClADYTbKOSuivjqybtZBQGMArdzzjttH6ZvQZ3DFZeQhLUdvO.XZRuIO65
MEpgoCH1WllBm.pUkIecfI65hCd5P0iMkDCUm7jEpZ4kvd+H.qtzSEcmbzbK
jRmbZ3WWFw8Fcw95JS1yhi0AmHr0mWnoj8MdgdH0gMzdW6cG03E1R1u.dgPf
Nocra5YsZw.ra47DOc8BsWzpNlNrcaw.7We0N9F1f9kofUWmXlSh42oWgtil
K9gtGRa.bejVc561twDXsRwZ2vTxcf+BXntMqtbMj9lpdWFoct7A5HSvbbzD
C9w1+CTfnlEM
-----------end_max5_patcher-----------

I’ve uploaded a few more Max for Live Objects:
=============================================
allnotesoff: The problem with stuck notes in Max is that you can only send a note-off to notes that Max knows are on. If its the case that a message was dropped, Max ignores any note-offs that might come later. This object was designed for working with a solenoid actuated piano, and, after audio has stopped in Live, turns all the notes on every channel on to velocity 1, then back off-two octaves at a time to prevent drawing too much power.
=============================================
harmonize: This object simply adds parallel notes to incoming MIDI. It comes in handy to thicken a synth sound, or to offset an instruments starting pitch.
=============================================
monome: Supports 64, 128, 256 and routes MIDI to whichever track its on. Multiple instances on multiple tracks may be used simultaneously, lights can show tempo or be turned off completely, and notes may be offset (36 is the default).
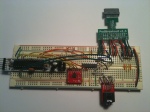
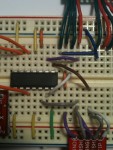
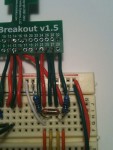
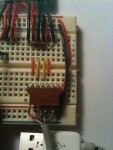
When you are looking at the connections from the Arduino, the serial communication is bright green (only the TX is being used), the SPI communication is orange, and the accelerometer is yellow. The resistors above the accelerometer are converting +5v to +3.3v(10k from +5v, and 15k to ground). The USB communication is on the right (+5v(pin23), D-(pin25), D+(pin27), Ground(pin 15)) and in some pictures there +5v on pin 23 and a 100kohmn resistor from pin 25 to +5v and from pin 27 to ground—this is so the ipod charges off the circuit. In order for the ipod to show up in itunes, these resistors on the data pins must be removed. The first picture is the pinout for the ipodBreakout (from p.405 iPhone Hacks by David Jurick, Adam & Damien Stolarz):


(updated 6/22/11)
/*
  ipod_controller_main

  This code controls an ipod embedded in a moving installation, such that sound only plays with the ipod is moving
  TX and RX pins on the Arduino are connected to pins 12 and 13 of PodBreakout

  Ipod serial communication only has volume control on mode 2, but since lots of ipods don't accept this mode, playback
  is done through mode 4, and fading volume is handled by a digital potentiometer (DS1801).
  +5v is connected to pin 14
  Pins 1, 4, 7, 10, 11 are connected to ground
  pin 6 LeftIn
  pin 5 LeftOut
  pin 9 RightIn
  pin 8 RightOut

  The SPI circuit looks like this:
  Arduino 10--- (SS) DS1801 pin 3
  Arduino 11--- (RX) DS1801 pin 12
  Arduino 13--- (CLK) DS1801 pin 13


  the X,Y,Z pins of an accelerometer are connected to analog 3, 4, 5


  Jeff Aaron Bryant, June 2011
*/


//serial commands for ipod
byte wake [] ={0xFF, 0x55, 0x03, 0x02, 0x00, 0x04, 0xF7}; //wakeup
byte mode_4 [] = {0xFF, 0x55, 0x03, 0x00, 0x01, 0x04, 0xF8}; //switch to mode 4
byte playlist [] = {0xFF, 0x55, 0x07, 0x04, 0x00, 0x28, 0x00, 0x00, 0x00, 0x00, 0xCD}; //startlist
byte play_pause [] = {0xFF, 0x55, 0x04, 0x04, 0x00, 0x29, 0x01, 0xCE}; //play_pause
byte skip [] = {0xFF, 0x55, 0x04, 0x04, 0x00, 0x29, 0x03, 0xCC}; //skip
byte back [] = {0xFF, 0x55, 0x04, 0x04, 0x00, 0x29, 0x04, 0xCB}; //back


//sizes
int wakeLength = sizeof(wake);
int mode_4Length = sizeof(mode_4);
int playlistLength =sizeof(playlist);
int play_pauseLength = sizeof(play_pause);
int skipLength = sizeof(skip);
int backLength = sizeof(back);

// include the SPI library
#include <SPI.h>

// set pin 10 as the slave select for the digital pot(DS1801)
int SS = 10;
int mute = 64;
int loud = 63;
int soft = 0;


void setup(){
  Serial.begin(9600);

    //startup ipod
  for (int i=0; i< wakeLength; i++){               //wakeup
                 Serial.print(wake[i],BYTE);
               }

               Serial.println("    WAKE");

  for (int i=0; i< mode_4Length; i++){          //mode 4
                 Serial.print(mode_4[i],BYTE);
               }

               Serial.println("    MODE_4");


  // set the slaveSelectPin as an output:
  pinMode (SS, OUTPUT);

  // initialize SPI:
  SPI.setBitOrder(LSBFIRST);
  SPI.setDataMode(SPI_MODE0);
  SPI.setClockDivider(SPI_CLOCK_DIV128);
  SPI.begin();
  delay(10);
  setVolume(mute);

}


void loop(){
  accelerometer();
  ipodCommands();
}


////////////////////////////////////////////////////////////////////////////////////////////////////////////////////////
//accelerometer
////////////////////////////////////////////////////////////////////////////////////////////////////////////////////////


int x, y, z;
int tilt= 0;
int lastTilt= 0;
int diff= 0;
int stillness= 8;
int moving= 0;
int slowing =0;


void accelerometer(){
  if (moving == 1 && slowing ==0){ delay (3000);}
  if (moving == 1 && slowing ==1){ delay (500);}
  if (moving == 0){ delay (200);}


  x =analogRead(5);
  y =analogRead(4);
  z =analogRead(3);
  Serial.print("   X=");
  Serial.print(x);
  Serial.print(" Y=");
  Serial.print(y);
  Serial.print(" Z=");
  Serial.print(z);

  tilt= x + y + z;
  diff= tilt-lastTilt;


  if (tilt != lastTilt && abs(diff)> 8 && abs(diff)< 400) {
    Serial.print(" MOVING!!!  ");
    Serial.print(diff);
    moving= 1;
    lastTilt = tilt;
    stillness= 0;
    slowing = 0;


  }
    else {
      stillness++;
      if (stillness< 7){
      Serial.print(" ...slowing...  ");
      Serial.print(diff);
      slowing = 1;

      } else{
          Serial.print(" STOPPED  ");
          Serial.print(diff);
          moving= 0;
          slowing= 0;
          lastTilt=tilt;

        }

    }

  Serial.println();

}


////////////////////////////////////////////////////////////////////////////////////////////////////////////////////////
//ipodCommands
////////////////////////////////////////////////////////////////////////////////////////////////////////////////////////

int state= 0;
int lastState= 0;
int startup= 0;

void ipodCommands(){
  state=  moving;


  if (state != lastState){

    switch (state){
      case 1: if (startup ==0){
                  for (int i=0; i< playlistLength; i++){          //start playlist at the beginning
                  Serial.print(playlist[i],BYTE);
               }

               Serial.println("    Startlist");
               for (int i = soft; i <= 10; i++) {            //turn up volume
                   setVolume(i);
                   delay(10);
               }
               for (int i = 10; i <= 63; i++) {
                   setVolume(i);
                   delay(250);
               }
               startup++;
               lastState = state;
               break;
                } else{


               for (int i=0; i< play_pauseLength; i++){      //pause
                   Serial.print(play_pause[i],BYTE);
               }
               Serial.println("    PLAY");

               for (int i = soft; i <= 10; i++) {            //turn up volume
                   setVolume(i);
                   delay(10);
               }
               for (int i = 10; i <= 63; i++) {
                   setVolume(i);
                   delay(250);
               }

               lastState= state;
               break;

      case 0:  for (int i = loud; i >= 15; i--) {             //turn down volume
                   setVolume(i);
                   delay(10);
               }
               for (int i = 15; i >= 0; i--) {
                   setVolume(i);
                   delay(50);
               }


               for (int i=0; i< play_pauseLength; i++){      //pause
                   Serial.print(play_pause[i],BYTE);
               }
               Serial.println("    PAUSE");


               delay (1000);
               setVolume(mute);                                  //mute


               for (int i=0; i< skipLength; i++){             //skip
                   Serial.print(skip[i],BYTE);
               }

               Serial.println("    SKIP");

               delay (500);
               lastState= state;
               break;
    }
  }
  }


}

////////////////////////////////////////////////////////////////////////////////////////////////////////////////////////
//setVolume
////////////////////////////////////////////////////////////////////////////////////////////////////////////////////////


void setVolume(int level) {
  digitalWrite(SS,HIGH);
  SPI.transfer(level);                                             	    //pot 0
  SPI.transfer(level);                                          	    //pot 1
  digitalWrite(SS,LOW);
}
Here’s the review and some photos from set-up/backstage Trimpin’s Gurs Zyklus:


This post is about playing with a broken FSR on a DrumKat that was giving no response at all, at any setting, from one of its pads
After looking for solutions online, it seems most folks are giving up on dead pads and sending in their drumKat for the FSR to be replaced. I was getting set to do this with mine (I found my Pad 1 was dead when I turned it on), but then I noticed that a new FSR isn’t guaranteed if you do it yourself- so I wanted to see how hard it would be… ***note I was sure that the pad was dead, and it wasn’t just some bad settings in the software***
Now there are instructions for changing the FSR on the Alternate Mode site… but after getting the getting everything off and looking at the FSR, I couldn’t see what could go wrong with it-apart from a failed connector. Since I had already decided to send the DrumKat in, I hooked up the FSR to a multimeter to see if I could get a reading at all from the dead pad.
If you look at where the lines are going, the middle track is shared by all the pads (pin 6 is ground) and the other pins are for each of the pads (pins 1-5, 7-10). By stripping long enough leads of test cable, right away I got a fluctuation in resistance on all the working pads, but Pad 1 wouldn’t move. Since I don’t have any tools to make a new connector, I next split the plastic with an x-acto knife enough that I could reach in with a test wire and touch Pad 1 somewhere along its path. I eventually found a spot that would read a fluctuation in resistance, but trying to solder to that spot was too ambitious. No matter how quick I was, it didn’t work and the plastic melted.
In the bottom corner (an inch down from where I had severed the connection) I glued the wire in with superglue and closed up the plastic with packing tape to give some integrity to the connection. I was worried about the width of the wire and wanted everything to still lay flat, so I ran the wire around the outside of the machine and back inside a little gap in the back panel. I secured all the corners with tape before closing up the front.
On the back I cut the Pad 1 lead (our green wire in the picture) and soldered it to the male end of pin 1. It totally worked! Pad 1 is alive and working again. If I were to try this same repair again, I would try more carefully to bypass the connector as close to the connector as possible to avoid having to run the wire around the other way (but I don’t feel like I had a lot of control over which layer of plastic I was in with the razor blade, so there maybe some chance in finding a good spot). ***also, when you are hooking things back together, you can leave the speaker (bottom left with a white connector) disconnected and never never hear it again


I’ve been working as a studio assistant for Trimpin… so mostly I’m working on his stuff lately- building instruments, figuring out hardware/software solutions, etc. I thought I’d post some videos from this week:
Testing the Ojai Sound Arch with a piece of mine Overlap Etude. This is just before we packed it up to take it down to California…
And this is a study I made quick today for mechanical piano. I didn’t have anything to do with building this instrument, but I am going to write some pieces for it…


